Microsoft Teams Forensics for Artifact & Content Investigation


Summary: Microsoft Teams is the most popular and industry-leading communication and collaboration software, it is being used by millions of users in their respective organizations. Which makes it a treasure trove of digital data and evidence while performing Teams forensics investigations. Hence, in this guide, we are going to learn a few ways to collect, preserve, analyze, and report digital evidence from the Microsoft Teams platform.
Table of Contents
What is Microsoft Teams Forensics?
Microsoft Teams, first released in 2017, saw a rapid rise in user adoption thanks to remote working during the pandemic. Moreover, its ease of use, countless functionalities, and seamless integration with other Microsoft services made it an industry favorite.
However, due to such advanced capabilities present inside it, many individuals with nefarious intentions have also started using it. That’s why investigators and agencies need to know the methods used to perform forensics on Teams.
Teams forensics investigation includes the process of collecting, preserving, analyzing, and documenting the reports of digital evidence from the Microsoft Teams platform. This includes the investigation and analysis of chat logs, voice and video call recordings, shared files, audit logs, user activities, and more.
All owing to the rapid rise of cybercrimes committed on and with the platform’s help. Hence, investigations of this evidence can help investigators uncover insider threats, data exfiltration, compliance violations, or other cyber incidents.
Components Of MS Teams
Chats: The most basic MS Teams feature part of its portfolio has had this feature since the beginning. Moreover, Chats have undergone regular changes over time. Moreover, users can now, edit, delete, react to, and reply to specific individuals. Apart from Text data Teams chats can be used to share a variety of file formats, emojis, stickers, etc.
Private Chats – Most Microsoft Teams Forensics is based on finding the content present in Private chats. Microsoft added this feature to enhance user privacy and protect people from unnecessary oversight. However, this was quickly being misused to conduct illegal and unauthorized conversations.
Channels – This is the term used by Teams to define a Group of users. Unlike a group chat, a Channel has to be created by authorized personnel. They can then set the permissions and invite other users.
Attachments – These are external files shared between individuals, groups, channels, or Teams. Such files include but are not limited to PDFs, Videos, Images, Doc files, and Spreadsheets.
Where to Find Microsoft Teams Forensic Artifacts?
Microsoft Teams is not a storage service. Its primary role is collaboration and communication between people. As a result, Microsoft designed Teams in such a way that users need not be concerned about data storage or other secondary tasks. Moreover, all of these are handled by other services like One Drive, SharePoint, etc.
All files created by users inside teams are directly put on their One Drive accounts. At the same time, the documents that are shared inside a channel generate a space inside the SharePoint site on the backend. Team-level sharing uses One Drive for business.
All of this results in a complicated maze when investigators want to conduct Microsoft Teams forensics. Not to worry as we condense the confusing steps into an easy-to-follow instruction set
Default Way to Conduct eDiscovery During Microsoft Teams Investigation
Step 1. Licence verification-assignment
- Admin center > Billing > Licenses
- Select product > Assign licenses
- Type name, select users
- Turn apps/services on/off
- Assign > Close pane
Step 2. Allow eDiscovery apps
- ComplianceWorkbenchApp
- Microsoft Exchange Online Protection
- Office365Zoom
Step 3. Apply eDiscovery permissions
- Login to the Compliance portal.
- Roles & scopes > Permissions > Microsoft Purview solutions > Roles.
- Select eDiscovery Manager, then Edit or Choose users.
- Add users > Next > review changes.
- Save to assign eDiscovery Manager/Administrator roles.
Step 4. Create New Case
- In the Left pane of the Compliance portal: Show all > eDiscovery > Core.
- Select Create a case, and enter the name (required) and optional description.
- Press Save
Step 5. Add Members (Optional)
- Open the eDiscovery case you created.
- Navigate to the “Members” tab within the case.
- Click on the “Add” button to add members.
- In the search bar, type the names of the individuals you wish to add to the case.
- Select users from the search results, and assign appropriate roles (e.g., eDiscovery Administrator or eDiscovery Manager).
- Review your selection and click “Save” to confirm.
Step 6. Build eDiscovery Hold
- Select eDiscovery > Premium/Standard > Case name.
- Go to Hold tab > Create.
- Name hold, add a description, and select Next.
- Choose content locations:
- Exchange mailboxes: Select users/groups/teams.
- SharePoint sites: Enter URLs.
- Exchange public folders: Toggle On.
- Add query-based hold (optional)
- Review settings and select Submit.
Step 7. Put MS Teams user/team content on hold
| Type | Location |
| User chat messages (1:1, group, private channel) | User mailbox |
| Standard/shared channel messages | Parent team mailbox |
| Standard channel files | Parent team SharePoint site |
| Private/shared channel files | Channel’s SharePoint site |
| User’s private content | User’s OneDrive for Business |
| Chats Card content | User mailbox (1:1, group, private) or parent team mailbox (standard/shared) |
Step 8. Set up eDiscovery search.
- Select eDiscovery > Core > Case > Open case.
- Visit Searches tab > New search.
- Name search, add description, and select content locations:
- Exchange mailboxes: Choose users/groups/teams.
- SharePoint sites: Enter URLs.
- Exchange public folders: Toggle On.
- Define search conditions:
- Type keyword query and add conditions (optional).
- Use Boolean operators and search conditions.
- Review settings and submit the search.
Step 9. Export search results.
- Select eDiscovery > eDiscovery (Standard) > Case name.
- Visit the Searches tab.
- Select Export results from the Actions menu.
Why is this platform being Used in CyberCrime?
Being relatively new, Microsoft Teams was not very well understood by law enforcement agencies. Moreover, as Microsoft adds new features almost every month, Teams became too much of a burden to tackle manually. Coupled with high user adoption and poor understanding, criminals made it their new playground. Not only criminals but disgruntled employees started using Teams for corporate espionage.
The Video Call feature is another way in which hackers can target naive employees. Resulting in blackmailing and ransom extraction.
The reason why Teams become so widely used by criminals is that they are also somewhat aware of the limitations of law enforcement agencies. Some of them are:
Manual methods are complex and require a deep, fundamental understanding of Teams structure and behavior. More often than not the investigating agencies may not lack the technical expertise. However, the time required to extract the information manually is what prevents detectives from pursuing the manual method. Don’t worry as we have an automated alternative to make the process easier.
How to do Microsoft Teams Forensic Analysis Professionally
MailXaminer is the utility that is best for the forensic analysis of Teams data. This is the same utility that is also known for its Skype forensic analysis. With an easy-to-use interface, the utility assists investigators in extracting data from a variety of sources. In its latest update, it has added the provision to bring in data from Teams via the admin credentials. Unlike manual methods, the tool has all the functionality in a single place. Everything from data extraction, aggregation, searching, sorting, and visualization is possible with the tool. Let’s go over the feature set in more detail.
Feature Set to Conduct an e-Discovery Investigation of Content in Microsoft Teams
- Separate section for user and team data ingestion to provide top-notch customization.
- Domain addition of Teams to bring in data for analysis
- Ability to pick Chats from specific dates.
- A variety of filtering and searching parameters are available at the click of a button.
- Inbuilt Dashboard to conduct data visualization via piecharts, timelines, Wordclouds, etc.
- Export Custom Search Results & download all loose files from the screen.
Simple Steps to Conduct Microsoft Teams Forensics Using Industry-Leading Software
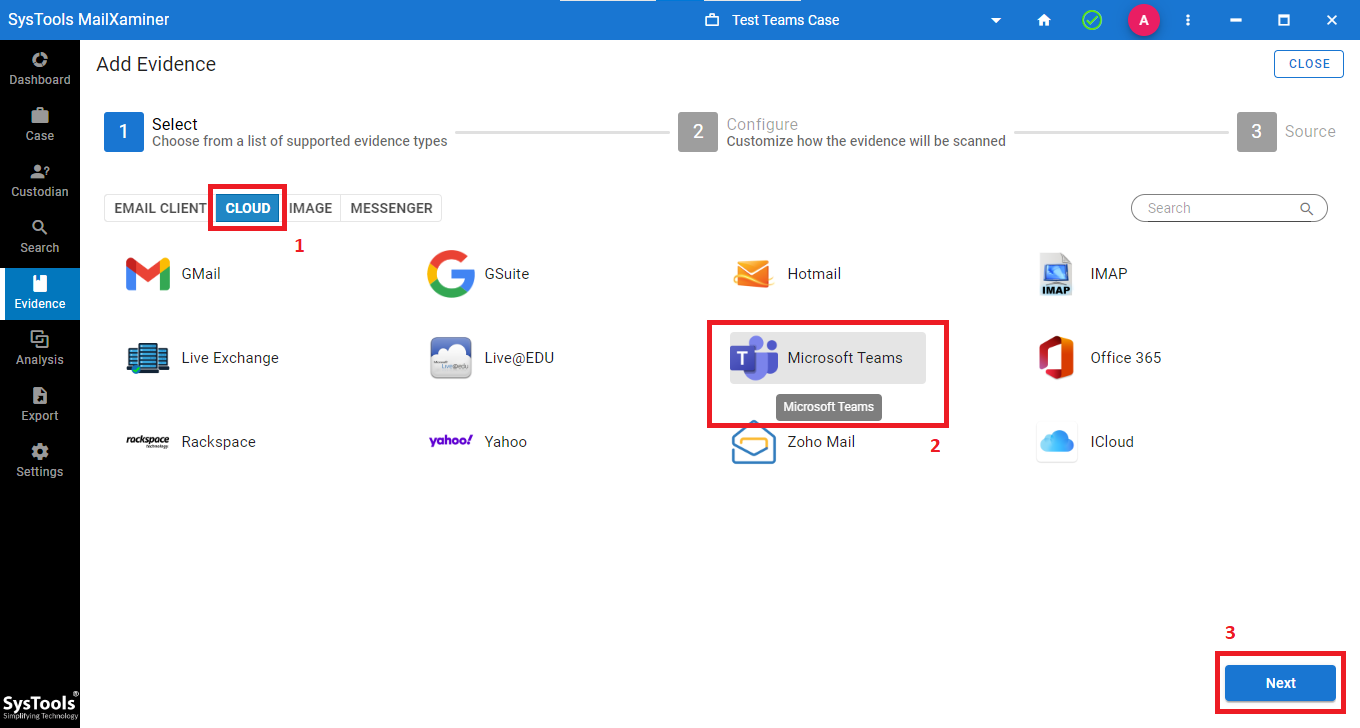
Step 1. Launch this email analysis software>> Create a New Case >> Click on Add New Evidence.
Step 2. Under the Cloud Subsection >> Select Teams as the Platform >> Press Next.
Step 3. Then, configure General Settings >> Index Settings (language) >> Hash Settings >> Press Next.
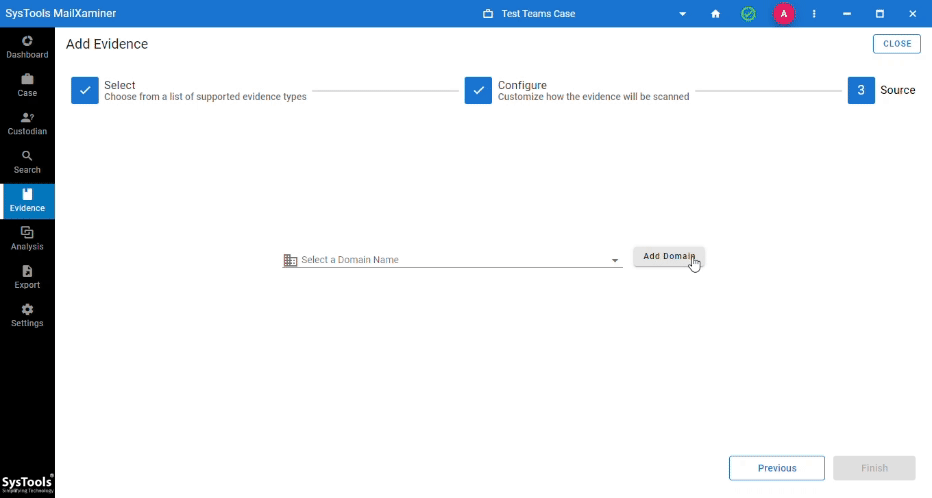
Step 4. Click on Add Domain >> Enter Domain Name >> Click Add >> Press Finish.
Step 5. Make Workload Selections >> Apply Date Filter For User Chats >> Press Next.
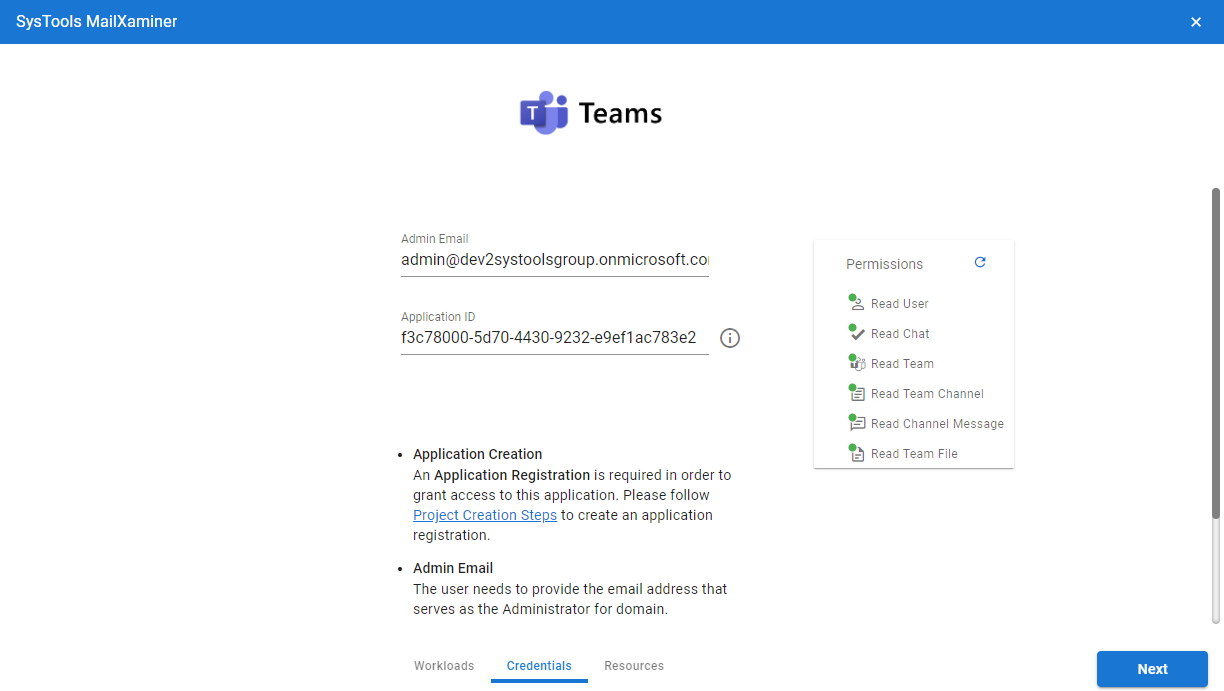
Step 6. Perform Credential Validation for Admin Email and Application ID >> Press Next.
Step 7. Then, choose a User Mapping option (Fetch, Import, Download)
Step 9. Preview >> Select >> Validate >> Ingest User data.
Step 10. Then, Map Teams Data >> Create Custodian >> Repeat the Same Steps as Users.
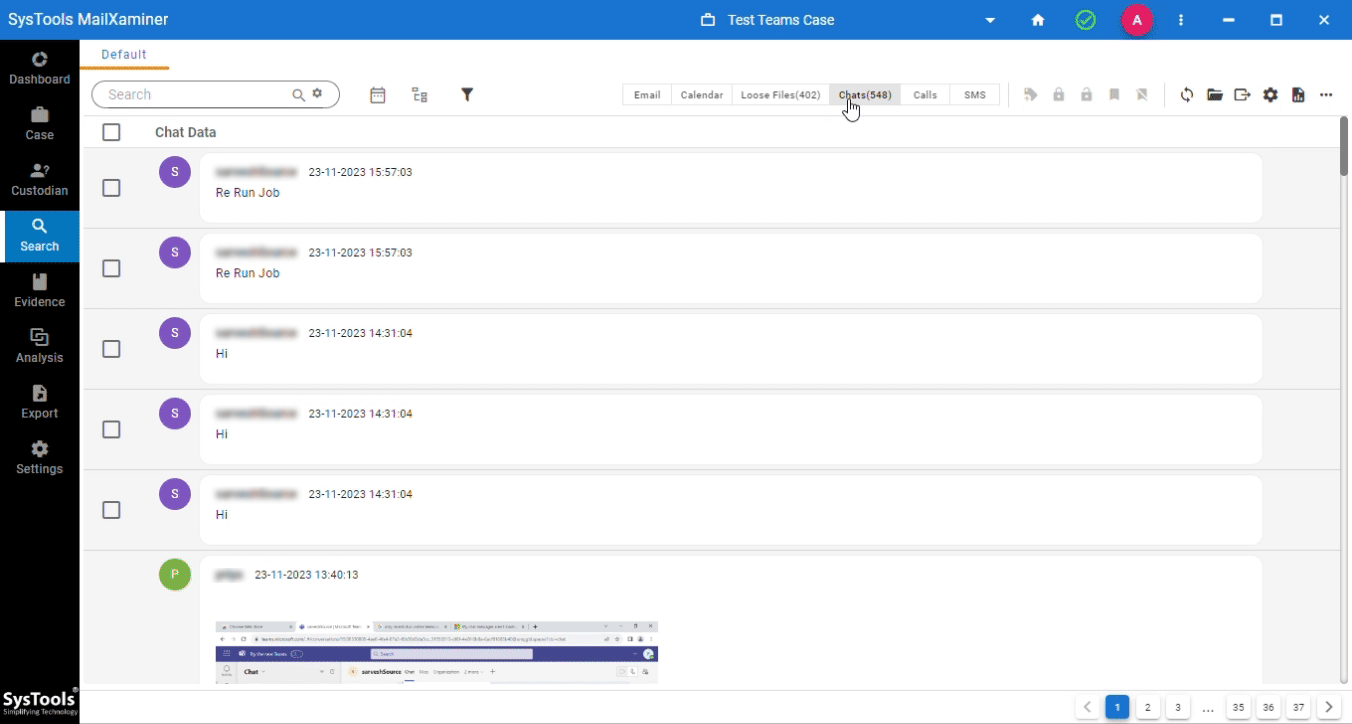
Step 11. Once data is available, go to the Search Screen. Here, Teams Data is split into two different tabs: Chats and Loose files.
Step 12. Finally, apply the filters, conduct a thorough search, and export the result of the Microsoft Teams forensic analysis.
Conclusion
In this blog, we discussed the approach investigators should take for Microsoft Teams forensics. Considering the challenges involved in the process, we recommend going for a professional tool. Additionally, the tool has special criteria for handling Teams as a source platform. Moreover, this makes the tool the best way to conduct a digital investigation of Teams data. Combining this with the additional features present eliminates the need for manual searching.
Frequently Asked Questions
Q. Is Content investigation in Microsoft Teams only limited to admin?
The default permission to perform eDiscovery lies with the admin. However, Microsoft allows admins to elevate the access settings of other users on the cloud platform. To do that here are the steps:
- Visit the eDiscovery (Standard) page and select the case you are working on.
- Click Settings > Access & permissions.
- Under Members, click Add to add individuals or Role groups to add groups.
- Select the desired members or role groups from the list (use Search if needed).
- Click Save to add the new members or role groups for artifact collection.
Q. What are some of the most critical challenges that investigators face during Microsoft Teams Forensics?
The Teams platform connects with many other apps inside the Microsoft 365 cloud ecosystem, moreover, it is not only limited to Teams, but complete Office 365 forensics is also required, and as a result, digital forensic analysts need to be wary of the following:
- Volume and velocity of the data.
- Enterprise-level encryption and access control locks.
- Variety of data sources, text, images, audio, video, etc.
Q. When to conduct an e-discovery investigation of content in Microsoft Teams?
Some of the scenarios that require a digital deep dive into MS Teams are:
- Aftermath of a confidential data leak or breach
- To keep an eye on possible insider threats
- Regulatory and compliance proceedings
- Legal requirement for court cases
And many more.